保持列印物冷卻的實驗
Keep it Cool!
(2010年六月舊文)幾週以前,我們發現了風扇的美好。我們認為發現了一個列印品質上的重大突破,於是我們開始整合列印頭週邊的風扇系統,主要的目的在於快速冷卻擠出後的塑料。獲得的結果是,我們得到更平滑的列印品質,特別是小區域的部份以及一些細微的區域。在這個討論中,尖塔是一個很好的例子 - 具有一個相對細小的交叉區域,同時是一個不斷向上並且收縮的列印路徑;通常這樣的造型物,會造成塑料維持在一個過熱的狀態,並呈現出一個幾乎融化而最終傾倒的結果;高高的塔尖往往都是結束在黏合一整團塑料的混亂狀態。風扇快速冷卻了塑料並改善這些狀況,透過讓塑料更快凝固的方式,讓最終的結果回歸預期。
A couple of months ago, we discovered the wonder of fans. We thought we found a great leap forward in terms of print quality when we began incorporating cooling fans nearby the print head. The focus was cooling the plastic quickly after it's having been extruded, and the result was much smoother prints, particularly with small parts or delicate areas. Towers are a good example of the issue – with a relatively small cross area, and continual build up of material in the same small area, the plastic stays too warm, practically molten, and eventually slumps. Rather than a tall spire, one ends up with a lumpy mess. Fans come to the rescue here by cooling the plastic more quickly, thereby allowing it to solidify, with the final result looking more like what one intended.
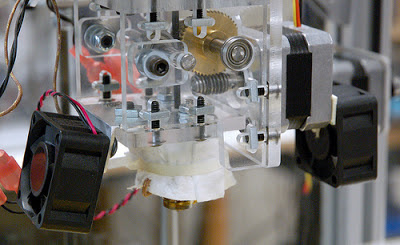
在我們最新的設計中,我們嘗試著去敲定風扇配置的相關細部;以及一路以來,將這些風扇整合在一起的決定。起初,我們假定我們會使用兩個風扇,兩兩相對並指向列印的噴頭。我們一共購買了三種不同的尺寸來實驗,分別是 20 x 20 / 40 x 40 / 60 x 60。每對風扇各有不同的對應位置 - 2020 的風扇位於距噴頭 1 英吋(2.54cm)的位置,4040 的風扇距離為 2.5 英吋(約10cm),而最大的風扇距離為 11 英吋(約28cm)。
In our latest design, we've been trying to hammer out the details of our fan configuration, and along the way, decided to ditch fans altogether. Initially, we assumed we would be using two fans, pointed towards each other, and just below the print head. We purchased 3 different sized of fans to experiment with – 20mm by 20mm, 40mm by 40mm, and 60mm by 60mm. Each pair had a different location within the printer – the 20mm fans were about an inch away from the print head, the 40mm fans were about 2.5 inches away, and the largest fans were about 11 inches away.
 |
| 40 x 40 風扇配置圖 |
 |
| 三種不同的風扇尺寸 |
雖然我們先後嘗試了數種不同的物件來測試,我們最後採用一個 70mm 高的三角錐造型為我們主要的測試物件。主要的目的是要印一個高、錐型的物件並且看它開始崩壞 - 換言之,主要查看塑料在哪一個位置開始因為擠出過快,導致無法獲得足夠的時間冷卻而維持結構的完整性。我們設想風扇將會提供更快速的散熱效果,因此這個物件將會獲得更結構性的回應。
Although we used a variety of test objects, we settled on a tall (70mm) three sided pyramid as our primary test object. The objective was to print a tall, tapering object and see where it began to slump – in other words, at what point was the plastic being extruded too quickly, such that it could not cool enough to maintain its structural integrity. Our assumption was that the fans would promote more rapid cooling, and thus the object would more structurally sound.
令我們吃驚的是,氣流的增加對於測試物件的列印完整性只帶來邊際的助益。另外,我們也嘗試了透過增加 4040 風扇的電壓來提升氣流的風量,然而這樣的改變並沒有達到我們的預期。在下面的圖片中,四種不同的風扇測試只改善了些微的列印品質。
To our surprise, the increase in airflow gave us only marginal gains in the structural integrity of the test objects. We additionally attempted to increase the airflow by supplying the 40mm fans with more voltage. While this improved things, the results were not what we were looking for. As can be seen in the picture below, the four different fan configurations we tried gave only small improvements in the final print's quality.
 |
| 原始狀態(無風扇)與四種風扇配置/測試結果 |
不滿足於現況的我們,開始尋找其他可能的選項。Skeinforge(切片引擎)有一個外掛的選項叫做 "Cool",這原來就是我們所需要的。特別是其中有一個欄位叫做 "Minimum Layer Time" ,可以讓你設定最短必須達到的列印時間,也就是每一層至少列印、停留的時間。另一個設定 "Cool Type" 可以告知 Skeinforge 當一個切層的列印短於特定時間時,要如何處理。在這裡我們使用 "Slow Down" 這個選項,基本上,這運作的方式就是你指定一個最小要達到的時間(在我們的測試裡,10秒已經達到一個不錯的成效),當一些切層小到一個程度時,列印頭的移動就會相對應而放慢。
Unsatisfied by the results we were getting, we began looking for other options. Skeinforge has a plugin called “Cool”, which turned out to be just what we needed. Particularly, one of the settings in the Cool plugin allows you to define a 'Minimum Layer Time'. What this does is let you specify the minimum amount of time it takes to build each layer. Another setting, "Cool Type", tells Skeinforge how to deal with layers when they would otherwise take less than the specified minimum time – we use the "Slow Down" option. Essentially, how this works is you specify a minimum time (in our case, 10 seconds seemed to work well), and then for any layer small enough, the print head moved correspondingly slower.
 |
| Skeinforge > Craft > Cool > Minimum Layer Time |
 |
| 之後的列印結果,兩者都沒有使用風扇測吹 主要的差別是右者更改了 Skeinforge > Cool 的冷卻設定 |
以下是我們的結論。雖然風扇有所助益,但是效果有限。對於微小、細微的部分,反而透過 Skeinforge > Cool 的冷卻設定可以達到特別的成效,並避免這些地方過熱。這個設定對於列印的改善,既簡單又助益良多!
Our conclusion is that, while fans are of limited usefulness, Skeinforge's Cool plugin is particularly useful for small parts that are prone to becoming too hot. I might add that the Cool plugin is much more easy to implement too.


