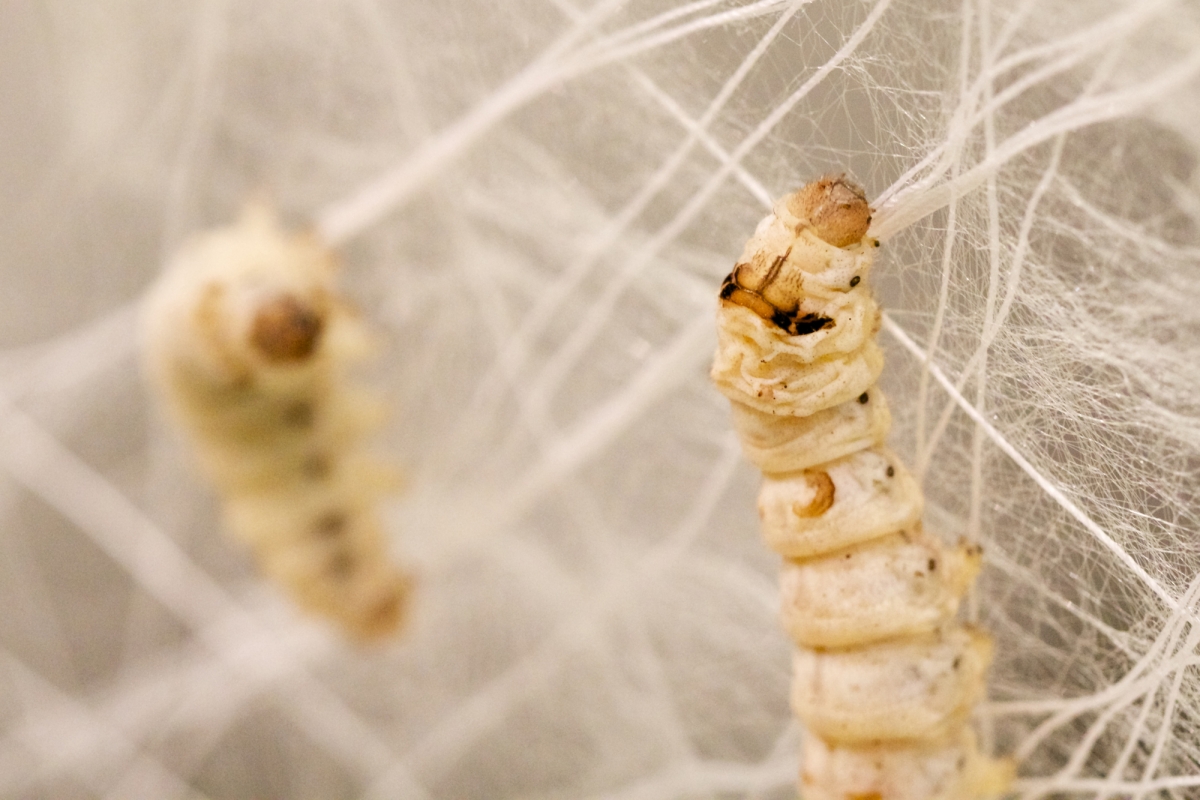
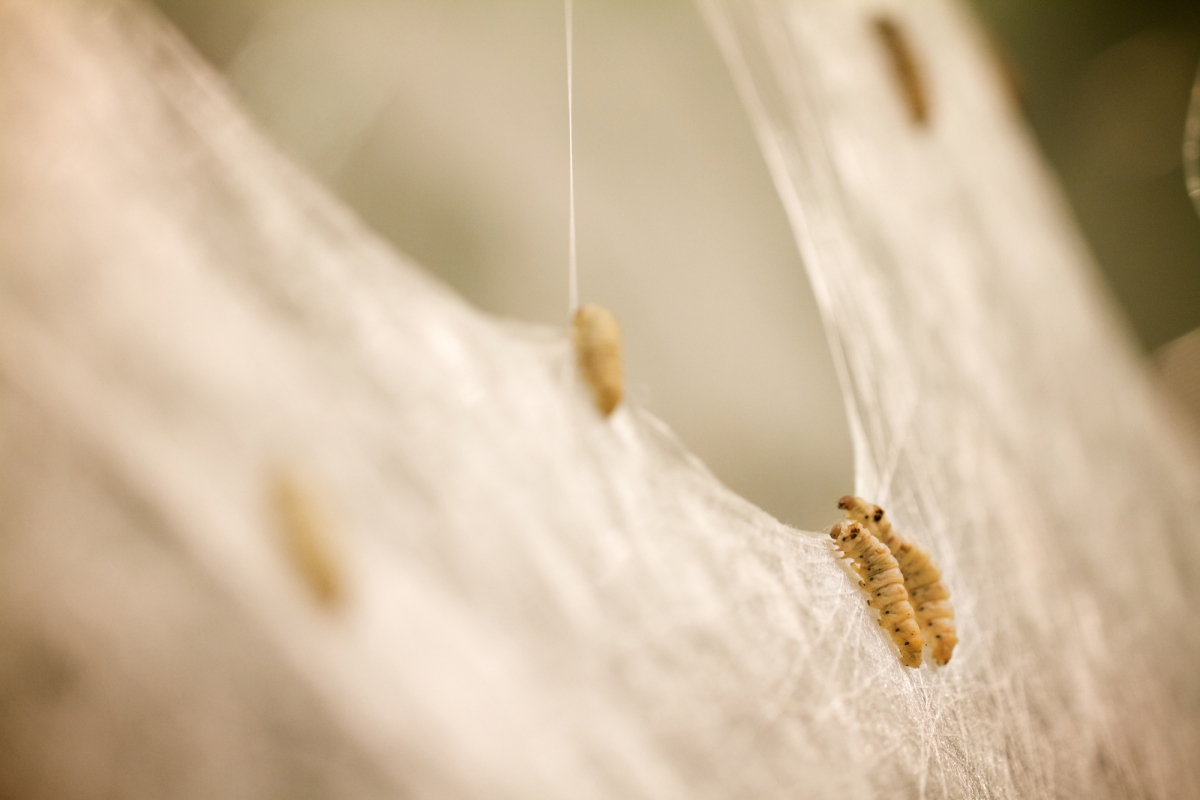
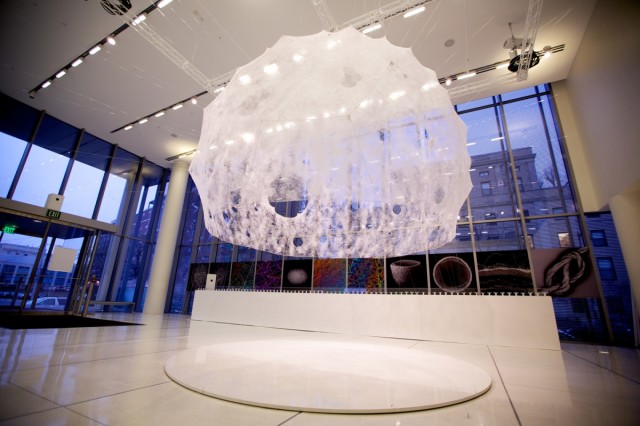
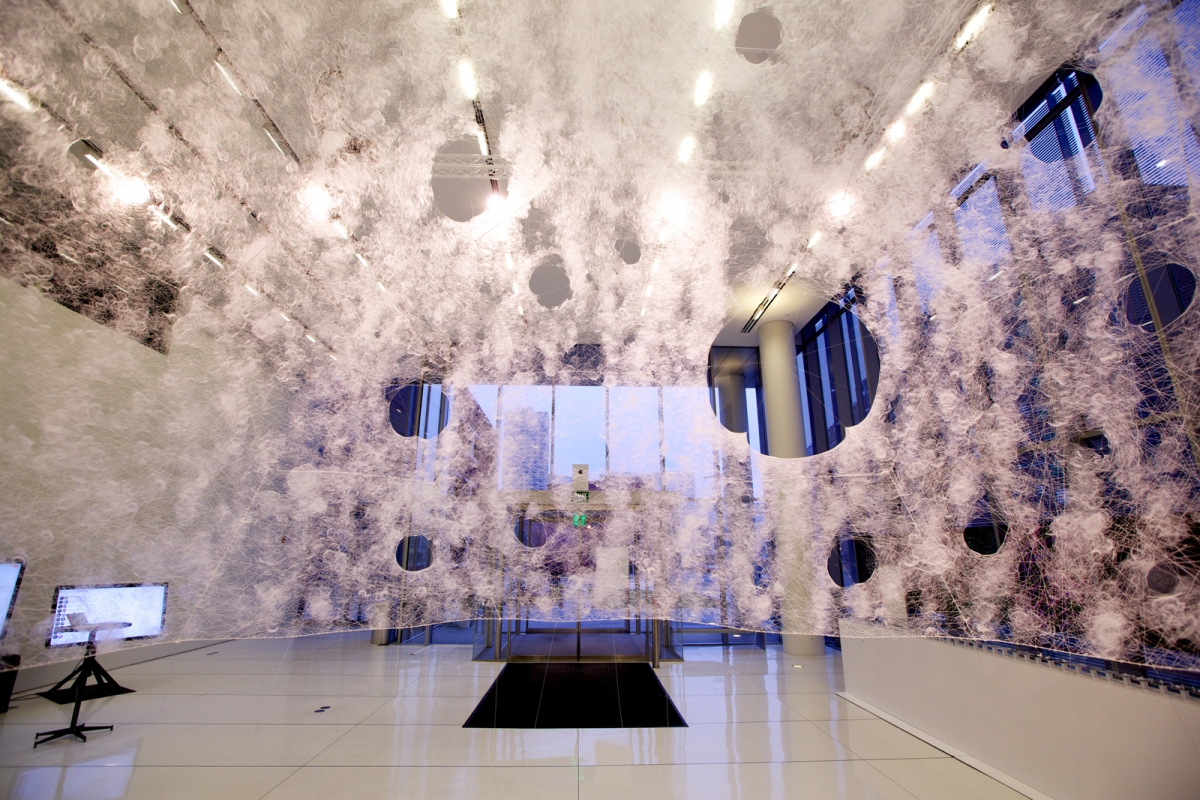
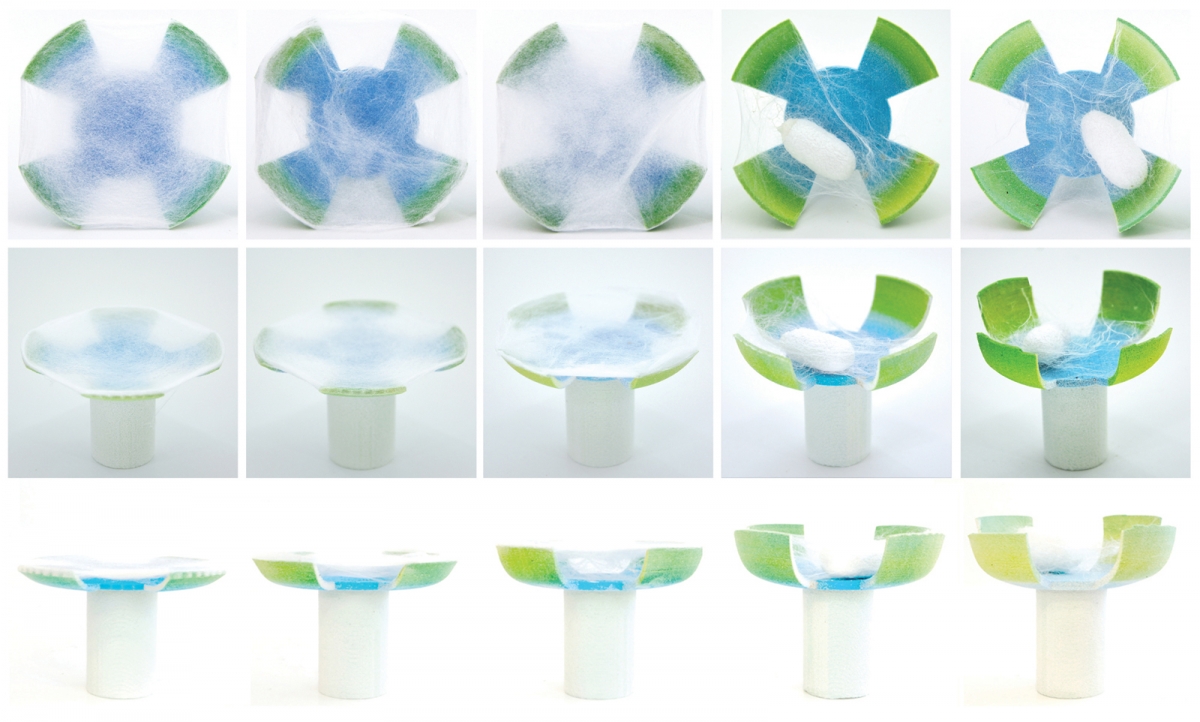
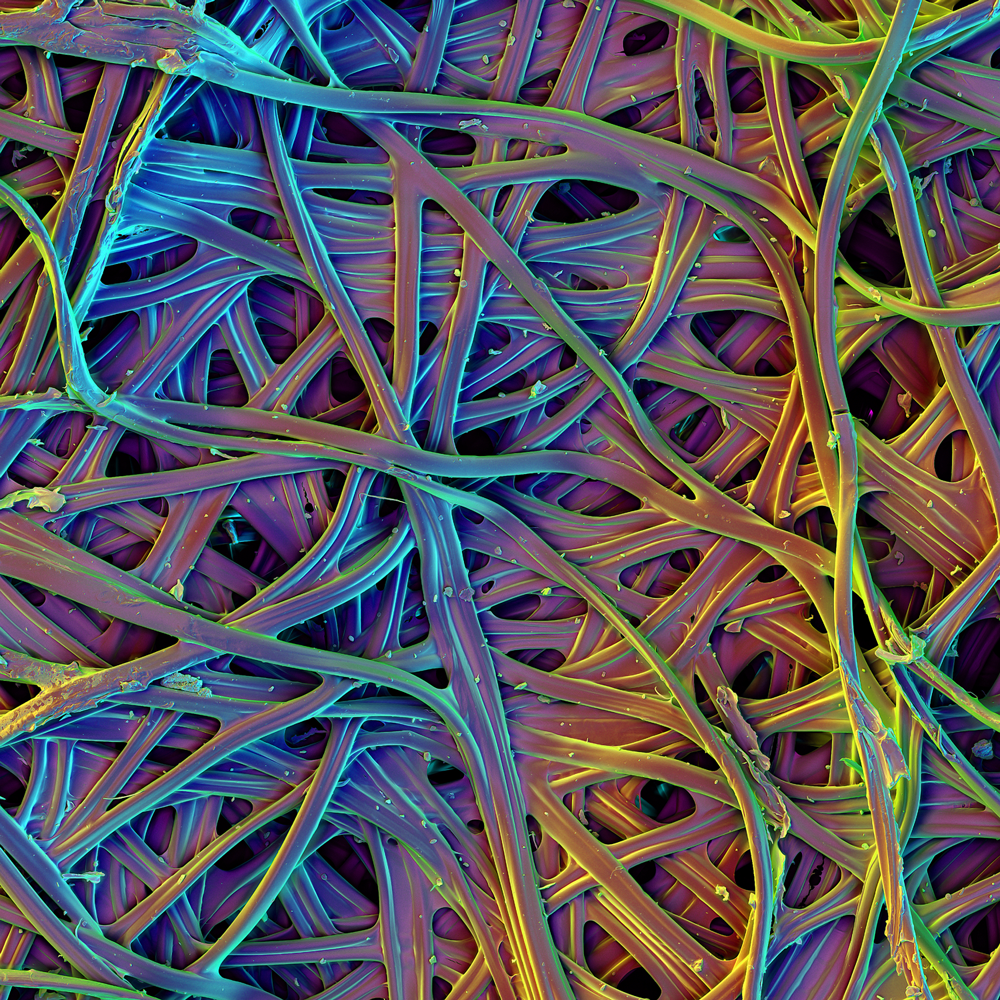
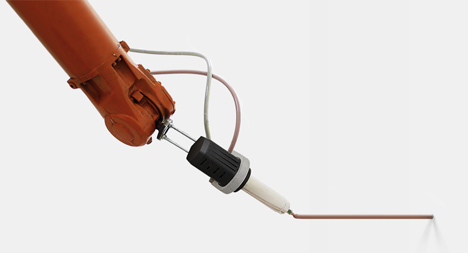
Silk Pavillion – CNC 蠶絲堆疊與蠶造結構/MIT Media Lab Silk Pavillion – CNC Deposited Silk & Silkworm Construction at the MIT Media Lab
這個案子由 MIT Media Lab 內的 Mediated Matter Research Group 所設計而成,"The Silk Pavilion" 試著將[數位構築]與[生物本能的建構模式]兩者找到連結,並拓展到物件/甚至建築的尺度。這個作品的主要結構是由 CNC(Computer-Numerically Controlled)將絲編造出一個具有26平面的主體,再透過約 6500 隻的家蠶,以群體編織的方式,針對這些預先定位的絲,對其間隙進行進一步的填補。
Research and Design by the Mediated Matter Research Group at the MIT Media Lab in collaboration with Prof. Fiorenzo Omenetto (TUFTS University) and Dr. James Weaver (WYSS Institute, Harvard University).
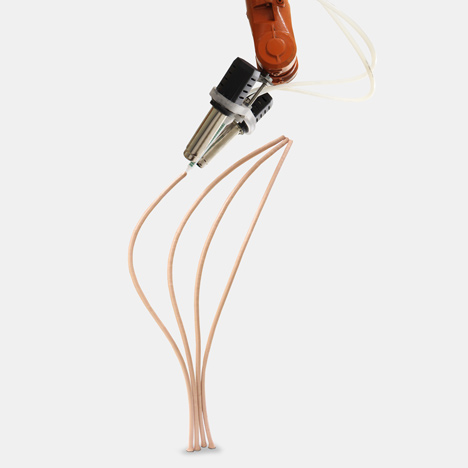
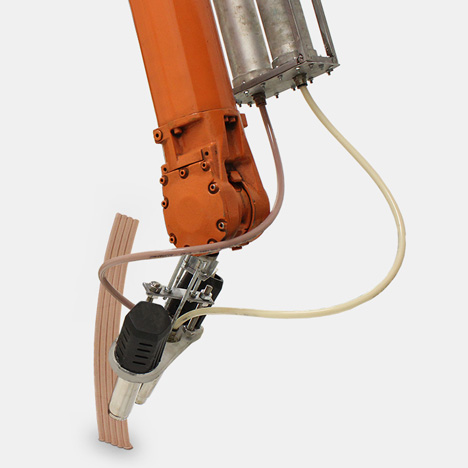
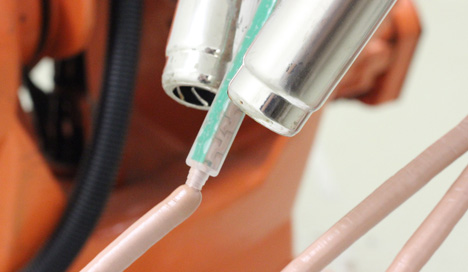
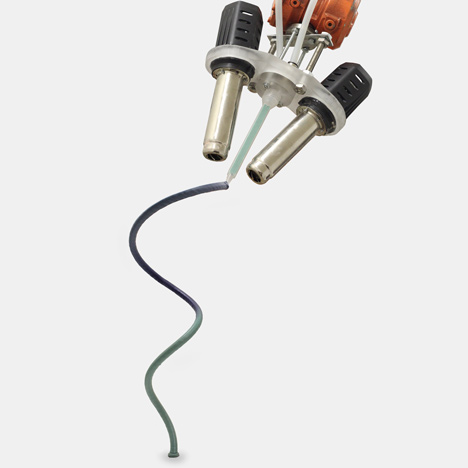
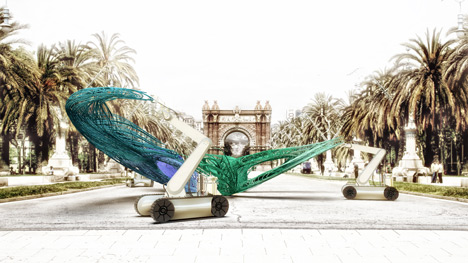
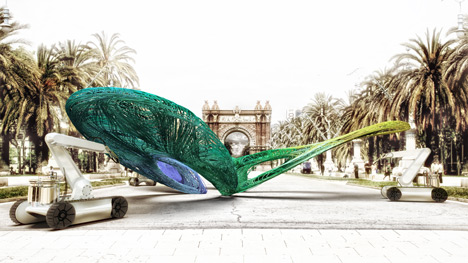
Mataerial /3D Printing 不用支撐材料的自由曲形 Mataerial by Petr Novikov, Saša Jokić, Joris Laarman Studio and IAAC
*本影片以三倍的速度撥放 The movie's frame rate was increased up to three times to show the process more quickly.
機器又推出了可調整顏色的新功能!!!
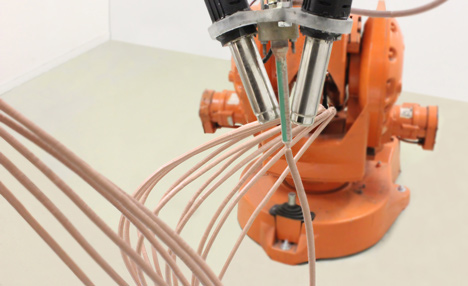
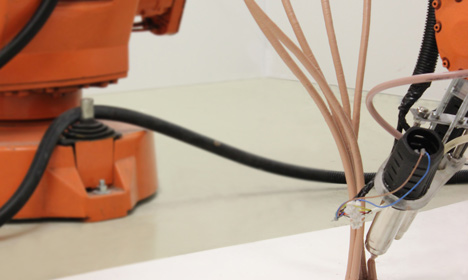
由機械手臂為主體的3D Printer,利用塑膠擠出後立即冷卻變硬的技術 得以在空中繪製出任何自由的表面與形體 Plastic extruded from this robotic 3D printer solidifies instantly, allowing it to draw freeform shapes in the air extending from any surface.
不同於一般的 3D Printer 需要一個水平的平台作為基礎,Mataerial 列印 的塑料可以是從水平、垂直、平滑的、非規矩的表面,並且不需要支撐材 Unlike normal 3D printers that require a flat and horizontal base, Mataerial prints with plastic that sticks to horizontal, vertical, smooth or irregular surfaces, without the need for additional support structures.
西班牙巴塞隆納 IaaC(Institute for Advanced Architecture of Catalonia) 的研究生 Petr Novikov 和 Saša Jokić,他們與荷蘭的設計師 Joris Laarman 共同發展出這個機器與系統 Petr Novikov and Saša Jokić from Barcelona's IaaC worked with the studio of Dutch designer Joris Laarman to develop the machine and system.
這個被原設計者稱之為"反重力建模"的系統,是一種由立即固化的擠出技術 來產出三維的實桿,而非一般 3D Printer 緩慢由下往上建構的二維切層堆疊 The process, which the designers call "anti-gravity object modelling", is a form of extrusion that instantly creates chunky three-dimensional rods, rather than slowly building up two-dimensional layers like a standard 3D printer.
這項"反重力建模"系統中一個關鍵的新技術,是採用熱固性聚合物,而非 廣泛使用於市面上 3D Printer 的熱塑性塑料。設計師補充解釋 "One of the key innovations of anti-gravity object modelling is the use of thermosetting polymers instead of thermoplastics that are used in existing 3D printers," explained the designers.
熱固性聚合物在擠出噴頭之後,兩個熱風槍作用下產生了材料固化的化學反應 使曲線的列印與懸空不再是不可能 A chemical reaction between the two components of the thermosetting polymer causes the material to solidify as it comes out of the nozzle, making it possible to print hanging curves.
材料擠出的速度取決於設定,通常是屬意的材料厚度;但是在這個例子中, 機器大約每三分鐘擠出一公尺的長度。 The speed of extrusion is dependent on factors such as the desired thickness of the material, but in this example the printer produced one meter in approximately three minutes.
更多關於這個案子的資訊: Mataerial is the result of the collaborative research between Petr Novikov, Saša Jokić from the Institute for Advanced Architecture of Catalonia (IAAC) and Joris Laarman Studio. IAAC tutors representing Open Thesis Fabrication Program provided their advice and professional expertise. During the course of the research we developed a brand new digital fabrication method and a working prototype that can open a door to a number of practical applications. The method that we call Anti-gravity Object Modeling has a patent-pending status.
Mataerial – a brand new method of additive manufacturing. This method allows for creating 3D objects on any given working surface independently of its inclination and smoothness, and without a need of additional support structures. Conventional methods of additive manufacturing have been affected both by gravity and printing environment: creation of 3D objects on irregular or non-horizontal surfaces has so far been treated as impossible. By using innovative extrusion technology we are now able to neutralise the effect of gravity during the course of the printing process. This method gives us a flexibility to create truly natural objects by making 3D curves instead of 2D layers. Unlike 2D layers that are ignorant to the structure of the object, the 3D curves can follow exact stress lines of a custom shape. Finally, our new out of the box printing method can help manufacture structures of almost any size and shape.
One of the key innovations of anti-gravity object modelling is the use of thermosetting polymers instead of thermoplastics that are used in existing 3D printers. The material is cured because of a chemical reaction between two source components with such proportion of extrusion and movement speeds that it comes solid out of the nozzle; this feature makes it possible to print hanging curves without support material.
The desired shape is created by user in CAD software and then transformed into 3d curves describing the shape which are then converted into movement paths for the robotic arm. The thickness of the printed curve can be scaled down to less than a millimeter and can be adjusted during the printing process, by changing the speed of the movement. Colors can be injected in the nozzle in CMYK mode that allows changing of the curve color throughout the printing process.
In our vision, Mataerial can be applied in different fields, from furniture and architecture manufacturing to desktop and space 3d printing. polymer *['pɒlimә] n. 聚合物, 聚合體 【化】 多聚體; 高分子; 大分子; 聚合物 【醫】 聚合物, 聚合體
有機建築的原型設計工具
近年來,Frank Gehry、Norman Foster 以及許多建築師們以有機表面來設計許多建築物的造型。在他們設計發展的過程中,至關重要的是使用 3D CAD 系統來建構模型,以及用電腦影像技術去渲染最後的成果來控制最後的形體。然而,設計師習慣於透過真實模型的掌控來控制這些造型與空間;因此,將虛擬的部分具體呈現的需求就產生了,3D Printer 的使用正是為此。然而目前 3D Printing 的輸出仍然需要非常長的一段時間等待。除此之外,以塑膠或是樹酯輸出的模型,是不利於快速修改與重新設計的。
Prototyping Tool for Organic Architecture
Recently Frank Gehry, Norman Foster and many other architects produce buildings with organic surface shapes. In their design process, it is essential to model and render the buildings using 3D CAD systems and CG in order to grasp the shapes.However, Architectural designers tend to like grasping shapes and spaces through physical models in real space. Due to this, an additional process is required to materialize the virtual models into tangible ones. 3D printers are used for the purpose. Although the current 3D printers requires a long hours to output models in many cases. Besides, 3D Printers use plaster or resin to output models, so that it is difficult to quickly modify and redesign them.
Smart Material Aided Architectural Design
Our approach is to use smart materials in the process of CAAD (Computer Aided Architecural Design). SMAAD is the abbreviated form of “Smart Material Aided Architectural Design” or “Shape Memory Alloy Aided Architectural Design”. SMAAD Surface is an instance of SMAAD which is implemented as a first prototype.
另一個可程式設計的表面
SMAAD Surface 使用纖維形狀記憶合金(SMA/Shape Memory Alloy)作為輸入、輸出的裝置。透過引用 Surflex 的技術(第一個可程式設計的表面[Coelho et.al 08]),我們改善了形狀維持、形狀紀錄、播放和反饋迴路之於任意曲面形狀的能力。這種織物的功能作為一種智慧材料的使用,設計者可以直接手動修改它的造型並聯動到虛擬。如我們所知的,flex sensor 偵測織物的形狀,驅動器則是用來維持造型,這樣設計師就可以用手動的方式來建立自由形體的表面。這一個表面的形狀會透過一個微控制器將數位資料送到 3D CAD 程式,上傳之後所有造型的修改也是以相同的方式同步更新。同樣的方式,如果數位的資料在 3D CAD 程式中修改了,這些資料將會被送到實體的模型,模型會依照這些數位資料進行形變。
Yet Another Programmable Surface
SMAAD Surface is a fabric input/output device that uses fibrous shape memory alloy (SMA). By referencing Surflex (the first programmable surface [Coelho et.al 08]), we have improved the ability to maintain, record and play back arbitrary surface shapes through feed-back loop. This fabric functions as a smart material and designers can modify its shape through manual operations. As the flex sensor detects the fabric shape and the actuator works to maintain the shape, a designer can model the fabric shape as if he/she manually models a free-form surface.The surface shape is sent to a 3D CAD through a microcontroller and the digital data can be modified in the same manner as the shape of the fabric device. In the same way, if the digital data is modified in the 3D CAD, the command is sent to the fabric device so that the fabric shape can be modified to follow the digital data.
UNDO and REDO function in real-space
The surface shape data sent continuously from the flex sensor is saved as operation history and used for the operation replay.This allows the UNDO/REDO operations of the modeling. With this function, a new function to relive the modeling process may also be realized.
動態建築
操作的紀錄與回放功能,也可以做為動作設計的記錄與再現,分成接下來的兩個步驟來執行。第一階段,從 flex sensor 記錄一段時間的資訊。第二階段是以 SMA 來重現同一區間內的操作。這樣的功能將提供適合動態建築的設計環境,例如 Hyposurface (Goulthorpe and dECOi, 2000) 或是 The Muscle Projects (Oosterhuis et al., 2008),這些案子都是近年來引起廣泛的注意。
Kinetic Architecture
The operation history saving and replay are also available as the function to record and reproduce motion design, executed in the two steps below. In the first step, the direct operations sent from the flex sensor are recorded in a certain period of time. In the next step, the recorded motion is applied to SMA in the same period of time to reproduce the motion. This function will be used for the design environment of kinetic architecture such as Hyposurface(Goulthorpe and dECOi, 2000) or The Muscle Projects(Oosterhuis et al., 2008), which are attracting attention in recent years.
一個可程式設計的實體/立即成形的原型
日前,我們成功的連接四組織物裝置。將來,如果可以連接數個到數十個設備,它將有機會發展成各式各樣的形狀。這意味著,SMAAD 有機會作為設計系統前期的快速成形系統。等待 3D Printer 的時間將不再必要,因為立即控制快速成形的技術將不再遙不可及。
A Programmable Matter for Immediate Prototyping
At present, we succeeded in connecting four fabric devices. In the future, if several dozens of the devices can be connected, it will be possible to actuate versatile shapes. This means that the SMAAD functions as a rapid prototyping system beyond design systems. Ling time to wait for the output from the 3D printer will not be necessary anymore and immediate prototyping will be possible to grasp shapes in a moment.
PUBLICATION-
Akira Wakita, Akito Nakano, Michihiko Ueno, SMAAD Surface: A Tangible Interface For Smart Material Aided Architectural Design, in Proceedings of CAADRIA 2011 - Circuit Bending, Breaking and Mending (The 16th International Conference of the Association for Computer-Aided Architectural Design Research in Asia), pp.355-364, Newcastle Australia, April 27-29, 2011. Best Paper Award
- Akira Wakita, Michihiko Ueno, Akito Nakano, pSurface: Fabric I/O Device for Architectural Algorithmic Design, in Proceedings of the International Symposium on Algorithmic Design for Architecture and Urban Design, ALGODE TOKYO 2011, March 14-16, 2011, Tokyo, Japan.
- 脇田 玲, 上野 道彦, 中野 亜希人, pSurface: 自由曲面モデリングとアニメーションのための布製入出力デバイス, インタラクション2011, 2011/3/12.
DESIGN TEAM
Concept and Direction: Akira Wakita
Hardware and Middleware: Michihiko Ueno
Software: Akito Nakano
告訴各位一個好消息,Sailfish韌體把一個叫做 "Ditto" 的功能放進 General Options 的選單裡,它的作用是可以讓你同時讓兩個擠出頭一起作用(雙噴頭同時列印)。如此以來就不需要透過編修 Gcode 來執行這樣的功能了。但是壞消息是,假如你忘了關掉這個功能....
So good news. Sailfish has an option under General Options called "Ditto" that when you turn it on runs both extruders at once. So no more running gcode through an exe to do that. The bad news, tho, is if you forget to turn it off...
忘記關閉這功能,又不小心列印到大的物件,就會打架了
恭喜和感謝網路神人Dan和Jetty大神讓這美夢成真!WOW Congrat to Dan and Jetty for making that a reality, tho.
A couple of months ago, we discovered the wonder of fans. We thought we found a great leap forward in terms of print quality when we began incorporating cooling fans nearby the print head. The focus was cooling the plastic quickly after it's having been extruded, and the result was much smoother prints, particularly with small parts or delicate areas. Towers are a good example of the issue – with a relatively small cross area, and continual build up of material in the same small area, the plastic stays too warm, practically molten, and eventually slumps. Rather than a tall spire, one ends up with a lumpy mess. Fans come to the rescue here by cooling the plastic more quickly, thereby allowing it to solidify, with the final result looking more like what one intended.
在我們最新的設計中,我們嘗試著去敲定風扇配置的相關細部;以及一路以來,將這些風扇整合在一起的決定。起初,我們假定我們會使用兩個風扇,兩兩相對並指向列印的噴頭。我們一共購買了三種不同的尺寸來實驗,分別是 20 x 20 / 40 x 40 / 60 x 60。每對風扇各有不同的對應位置 - 2020 的風扇位於距噴頭 1 英吋(2.54cm)的位置,4040 的風扇距離為 2.5 英吋(約10cm),而最大的風扇距離為 11 英吋(約28cm)。
In our latest design, we've been trying to hammer out the details of our fan configuration, and along the way, decided to ditch fans altogether. Initially, we assumed we would be using two fans, pointed towards each other, and just below the print head. We purchased 3 different sized of fans to experiment with – 20mm by 20mm, 40mm by 40mm, and 60mm by 60mm. Each pair had a different location within the printer – the 20mm fans were about an inch away from the print head, the 40mm fans were about 2.5 inches away, and the largest fans were about 11 inches away.
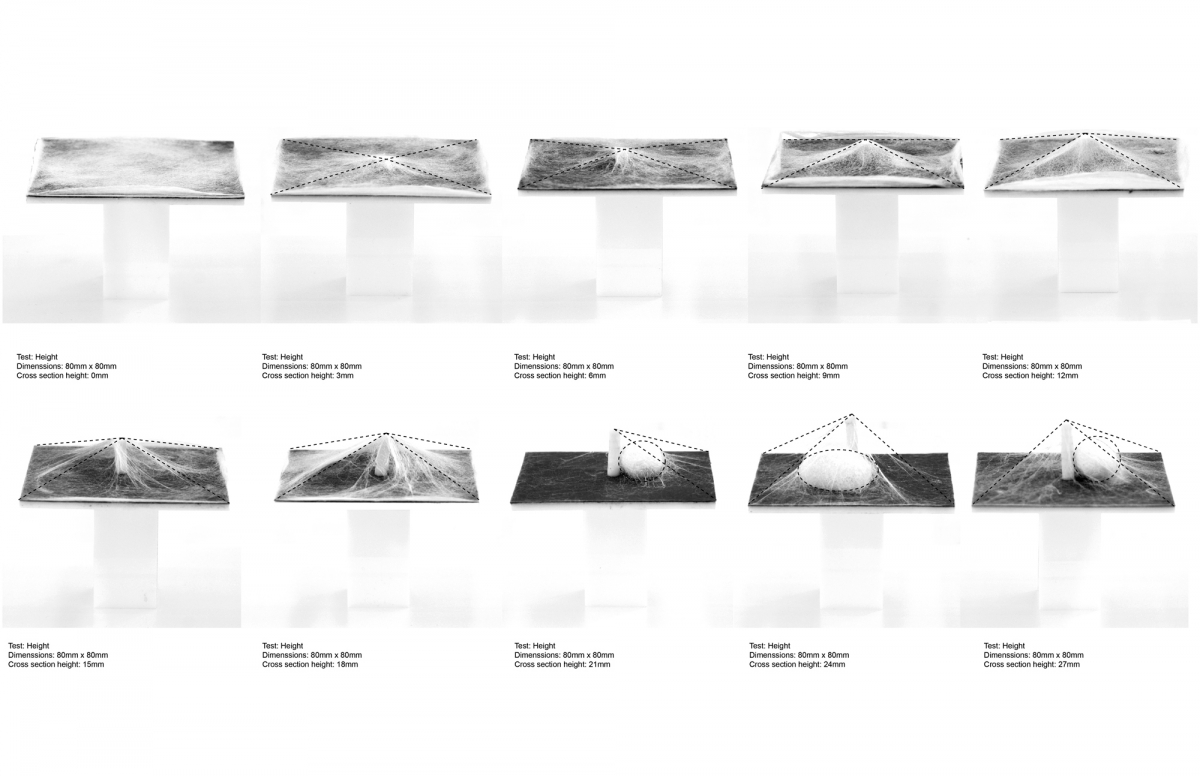
Although we used a variety of test objects, we settled on a tall (70mm) three sided pyramid as our primary test object. The objective was to print a tall, tapering object and see where it began to slump – in other words, at what point was the plastic being extruded too quickly, such that it could not cool enough to maintain its structural integrity. Our assumption was that the fans would promote more rapid cooling, and thus the object would more structurally sound.
To our surprise, the increase in airflow gave us only marginal gains in the structural integrity of the test objects. We additionally attempted to increase the airflow by supplying the 40mm fans with more voltage. While this improved things, the results were not what we were looking for. As can be seen in the picture below, the four different fan configurations we tried gave only small improvements in the final print's quality.
Unsatisfied by the results we were getting, we began looking for other options. Skeinforge has a plugin called “Cool”, which turned out to be just what we needed. Particularly, one of the settings in the Cool plugin allows you to define a 'Minimum Layer Time'. What this does is let you specify the minimum amount of time it takes to build each layer. Another setting, "Cool Type", tells Skeinforge how to deal with layers when they would otherwise take less than the specified minimum time – we use the "Slow Down" option. Essentially, how this works is you specify a minimum time (in our case, 10 seconds seemed to work well), and then for any layer small enough, the print head moved correspondingly slower.
Our conclusion is that, while fans are of limited usefulness, Skeinforge's Cool plugin is particularly useful for small parts that are prone to becoming too hot. I might add that the Cool plugin is much more easy to implement too.


